Multi-Camera Editing in Premiere Pro: My Battle-Tested Workflow
The first multicam project I ever cut was a live concert. Five cameras, three hours of footage, no timecode sync, and a hard deadline of 48 hours. I spent the first six hours syncing clips by waveform by hand, clicking back and forth between angles, trying to build a timeline that made sense. I got it done, but it was the most painful edit of my career. I swore I would never work that way again.
Fifteen years later, multicam is a regular part of my work. Two and three camera interviews. Live events with five or more. Music performances. Corporate presentations. Premiere Pro's multicam tools have improved dramatically since that concert, and I have built a workflow that handles everything from a simple two camera interview to a complex six angle live production. This is the whole thing, from sync to delivery, including the mistakes I made along the way.
Before You Import: Know Your Sync Method
Premiere Pro offers two ways to sync multicam clips, by timecode and by audio waveform. The method you use shapes your entire prep workflow, so decide before you start.
Timecode Sync
Timecode sync is fast, precise, and reliable, but only if your cameras were jam synced or shared a common timecode source. Cinema cameras, many broadcast cameras, and any setup with a Tentacle Sync or Ambient MasterLock will give you matching timecode across sources. Select all clips from all cameras, right click, and choose Create Multi-Camera Source Sequence. In the dialog, pick Timecode. Premiere builds the clip automatically.
The catch: if your timecode does not actually match, you get a perfectly aligned clip that is perfectly wrong. Always spot check the first few edits. Look for a clear sync point, a clap, a door slam, someone saying action, and verify every angle hits it at the same moment.
Audio Waveform Sync
Audio waveform sync is what I use about 80 percent of the time. It works with any footage that has audio, regardless of camera type. Premiere analyzes the waveforms across all clips and aligns them on matching patterns. Select all clips, right click, Create Multi-Camera Source Sequence, choose Audio. It takes a few seconds per minute of footage.
Where audio sync struggles
- •It needs clean audio. If one camera's audio is buried under wind or distortion, Premiere may not find a match.
- •It fails on identical audio. Two cameras fed from the same line input produce waveforms too similar to tell apart.
- •It is slower with music. Live music syncs fine because the music is the reference, but it can take longer to process than speech.
"For the most reliable audio sync, I record a scratch audio track on every camera, even the ones that will use the clean mix later. That scratch track is your sync reference. Get audio into every camera however you can: line out from the mixer, a cheap lav, even the built in mic if it is close enough to hear clearly."
- Piotr Toczynski
Manual Sync (When Everything Else Fails)
Sometimes timecode is wrong and audio sync fails. That is when you go manual with markers.
- Open each camera's clip individually in the Source Monitor.
- Find a clear sync point, a clapper slate, a hand clap, someone saying marker.
- Place a marker at that exact frame with the M key.
- Repeat for every camera angle.
- Select all clips, right click, Create Multi-Camera Source Sequence, choose Marker as the sync method.
It is tedious but bulletproof. On that first concert I marked the drummer's first snare hit, visible on all five cameras. It took an hour, but the sync was frame accurate.
Creating the Multi-Camera Source Sequence
Once you have chosen your sync method, a few dialog options are worth understanding. For Sequence Preset I always choose Automatic so Premiere matches your primary camera footage. Handle any delivery format change at the sequence level, not here.
Audio matters most. Camera 1 uses only the first camera's audio, which I pick when Camera 1 has the clean mix. All Cameras creates a separate audio track per camera, which I use when I need iso tracks for the mix. Switch Audio enables audio switching alongside video, which I rarely use because it can cause pops and level jumps. My standard choice is Camera 1 for the main audio, with All Cameras only when I know I will need iso tracks.
For Camera Names I prefer Enumerate Cameras for a clean angle viewer. And for Sequence Settings I always choose Stack, which puts every angle on its own video track. Switch creates a single switching track that sounds convenient but makes later adjustments much harder. Stack gives you flexibility, and you can flatten later if you need to.
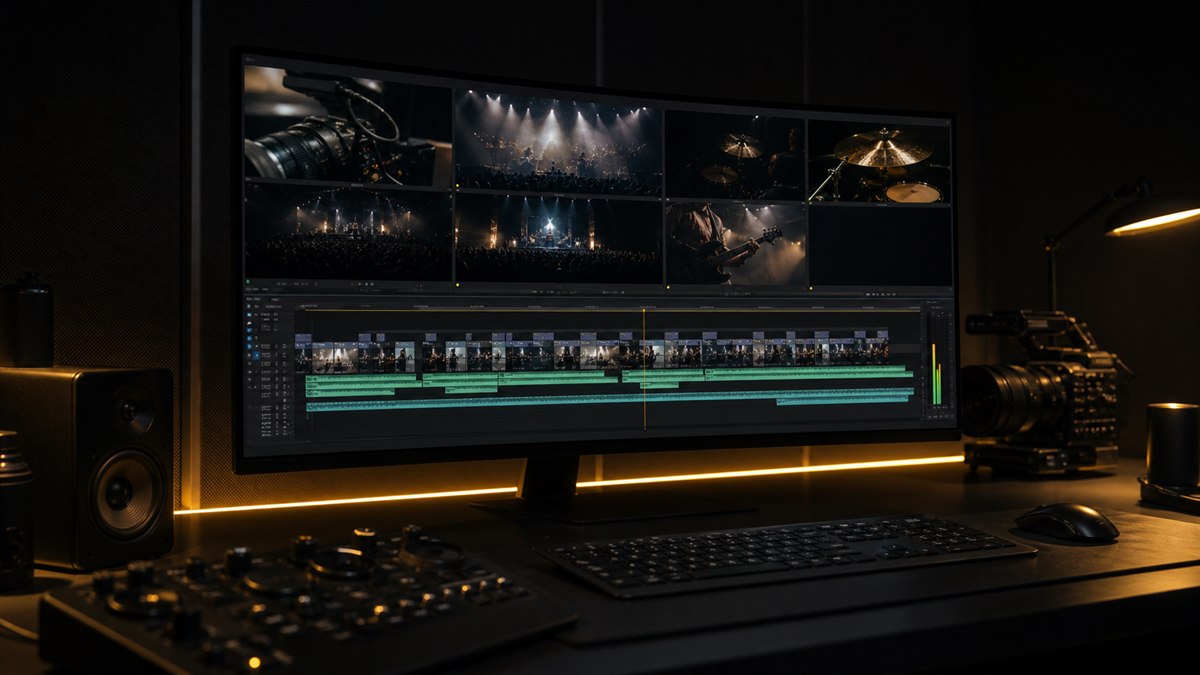
The Angle Viewer: Your Command Center
Load the multicam clip into the Source Monitor, click the wrench icon, and choose Multi-Camera to open the angle viewer. You see every angle as a grid of small monitors, with the active angle outlined in yellow. Press the number keys 1 through 9 to cut to an angle in real time. Hit the spacebar to play, then tap numbers as you watch, and Premiere drops a cut every time you switch.
Live switching is great for live events where the right angle is obvious, interviews where you want to follow the conversation, and performances where timing matters. For scripted work or anything that needs precise cutting, I park the playhead where I want a cut and click the angle I want. Same control, none of the pressure.
For more than four cameras I prefer the list view, which shows camera name and timecode beside each angle. You can also rename angles to something descriptive. Click the small triangle next to the angle viewer wrench, choose Edit Cameras, and name each one Wide Shot, Close-Up, Handheld, Drone. The names carry through to the timeline, which makes handoffs to other editors much clearer.
Two Phases: Assembly, Then Fine Cut
Every multicam project moves through two phases, the assembly that gets coverage onto the timeline and the fine cut that makes it good. In the assembly pass I work fast and loose. The goal is the right angle at roughly the right time. For a two camera interview I often do this in real time, switching between the wide and the close-up as the conversation flows. For a four camera live event I switch to whatever angle has the best view of the action and skip any camera that is blocked.
The assembly always has problems: cuts that land mid blink, switches a beat too late, angles that hold too long. That is the fine cut. I flatten the multicam sequence, which converts the multicam cuts into regular edits on regular tracks. Now I can roll edit points to tighten timing, replace angles by match framing back to the multicam clip, add cutaways and B roll without the structure getting in the way, and color correct individual clips instead of grading the whole multicam clip at once. To flatten, select the clip, right click, and choose Multi-Camera then Flatten. It is non destructive, so you can always go back.
Common Multicam Pitfalls
When you cut from Camera 1 to Camera 2 and back to Camera 1, watch for a jump cut within Camera 1's own footage. If the subject moved or the operator reframed between uses, cutting back can look jarring. Check the continuity of each angle across its uses.
If you used All Cameras for audio and you hear several sources at once, you get phase cancellation, that hollow underwater sound. Keep only one audio track active per moment. Solo each track and check. When you switch sources mid edit, make a clean cut and mute the outgoing track.
New multicam editors switch too often, sometimes every sentence, which makes a frantic, unwatchable edit. My rule: hold an angle for at least 5 to 10 seconds unless you have a reason to cut. Let shots breathe. On a two camera interview I often hold the close-up for a whole answer, then cut to the wide for the transition or a reaction.
Playback also gets heavier with each angle. A six angle clip at full resolution can stutter even on a strong machine. The fix is proxies, and multicam with proxies is smooth even on a laptop. If you have not set that up yet, my proxy workflow that lets me edit 6K on a laptop walks through it. You can also drop the angle viewer to Low Resolution for playback, or disable angles you will not use with the small eye icon to reduce system load.
Delivering Multicam Audio Stems
On almost every multicam project the client or the audio mixer wants separate audio stems per camera angle. Maybe they need iso tracks for a different language mix, or room mics separate from lav mics for an Atmos version. If you used All Cameras, those iso tracks live inside your multicam clips, but getting them out as clean deliverables is tedious. You solo each track, export, and repeat, once per angle, multiplied by every clip you have.
I use Track Exporter for this. It exports every audio track in your sequence as a separate file, properly named and timecode synced. Point it at the finished multicam timeline, pick your output format, and it returns individual files for every track. The mixer gets clean, organized stems and I do not spend an hour on manual exports. It has saved me on every multicam delivery since I bought it.
Advanced Techniques
When an angle has a problem that only affects part of a take, a boom shadow, a focus hunt, an overexposed sky, you do not have to lose the angle. After flattening, replace the bad section with an alternate angle that covers the same content. If both angles have problems, that is what B roll is for.
On complex projects I nest multicam sequences inside other sequences. A multicam clip for each interview subject, then a master sequence that intercuts those clips with B roll and graphics. Each interview stays a self contained unit and the master handles the broader structure. With proxies the nesting barely costs performance. Without them, test before you commit to a heavily nested structure.
A Real-World Example
Last month I cut a corporate event: four cameras, six hours of content, delivered as a 90 minute highlight reel. Day one was ingest and sync, with proxies generated automatically and multicam clips built for each of six segments. Audio sync worked on five of six, and one segment with corrupted audio got manual marker sync. Day two was assembly, live switching for the keynote and awards, angle by angle clicking for the panel. Day three was the fine cut, flatten, roll edit points, add venue and audience B roll above the multicam layer, replace a few angles with technical issues. Day four was delivery prep, color per clip, audio mix with iso tracks exported via Track Exporter, final ProRes 422 HQ. Four days total. Without the multicam workflow it would have been two weeks minimum.
Final Thoughts
Multicam editing is one of Premiere Pro's strongest features. Once you understand the sync methods, the angle viewer, and the flattening workflow, it becomes second nature. The key is discipline: sync carefully, check your work, do not over switch, and flatten before you fine cut. And when it is time to deliver those audio stems, let a tool handle the busywork so you can get back to the edit itself.
Want more like this? Browse the CTTP blog, set up proxies with my proxy workflow, and grab Track Exporter for one click multicam audio stems.
Share this article